Thursday, September 5, 2024

How to Install RSAT on Windows 11 - 23H2

 Run Powershell as Admin

Change the following registry key that manages the Windows Update source.

HKEY_LOCAL_MACHINE\SOFTWARE\Policies\Microsoft\Windows\WindowsUpdate

SetPolicyDrivenUpdateSourceForQualityUpdates REG_DWORD 0

Use the below command to install all RSAT Features

Get-WindowsCapability -Name RSAT* -Online | Add-WindowsCapability -Online

Once you've installed it, revert the value back to 1.


Tuesday, July 18, 2023

How to Install Windows 11 VM on ESXi Host for Capturing MDT Image

 Once you create the VM on the ESXi Host, Boot from Windows 11 ISO

You will get the below Error message.


Press Shift +F10 and Enter the below command

REG ADD HKLM\SYSTEM\Setup\LabConfig /v BypassTPMCheck /t REG_DWORD /d 1

Type Exit, and you can start the installation process again.

NB: Make sure you delete the Registry Key before you do the MDT Capture process.

Friday, May 12, 2023

Powershell script to find a Folder location in outlook

Very useful when you have hundreds of folders in the user mailbox or shared mailbox, and you want to find a specific folder that was accidentally moved. 


Import-Module ExchangeOnlineManagement

Connect-ExchangeOnline -UserPrincipalName <Enter your admin exchange admin or global admin credentials>

# Search for the folder

$folder = Get-MailboxFolderStatistics -Identity "enter the mailbox address" | Where-Object {$_.Name -eq $folderName}

# Check if the folder exists

if ($folder -ne $null) {

    Write-Host "The folder '$folderName' is located at $($folder.FolderPath)"

} else {

    Write-Host "The folder '$folderName' was not found."

}

# Disconnect from the mailbox

Remove-PSSession $session

Friday, October 21, 2022

MDT Sysprep and capture not working after updating ADK

 I have created a new MDT server with Windows11 ADK and since then, I couldn’t get the MDT "Sysprep and capture" task sequence working.

I was trying to capture the image using VMware VM, and as soon as the computer restarted after the Sysprep, it went into a reboot loop.


After trying multiple troubleshooting, I found the below article from Johan Arwidmark.

https://www.deploymentresearch.com/making-mdt-work-with-windows-adk-2004-for-bios-machines/

The way I got it working is not only adding the FixUEFIDetection.wsf but also updating the MDT using the KB4564442

https://download.microsoft.com/download/3/0/6/306AC1B2-59BE-43B8-8C65-E141EF287A5E/KB4564442/MDT_KB4564442.exe

Once you download the file, double-click on it to extract it. It will create an x86 and x64 folder.

You must copy and replace the file in the Driveletter:\Deploymentshare$\Tools\x86 and x64 folder

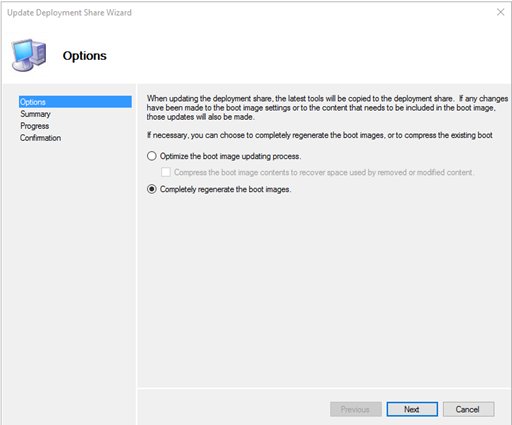
Completely regenerate the boot images


Once finished, you should be able to capture the image successfully


Thursday, August 4, 2022

Find GPO's applied to a computer if the gpresult /r and rsop.msc failed to load due to permission

How to see the group policies applied to a computer if the gpresult /r and rsop.msc failed to load due to domain permission

Run the command prompt as administrator

Enter gpresult /Scope Computer /v

This will show all the GPO policies applied to the computer in detail.

 or Enter gpresult /r /scope:computer


Wednesday, August 18, 2021

Use office deployment tool to install Office365 on MDT Image

 Download the Office deployment tool from Microsoft

https://www.microsoft.com/en-au/download/details.aspx?id=49117

Extract the file to your local machine.


The extracted folder will look like below

Depending on the version, edit the .xml file or create a copy of the .xml file. I have made a copy of the .xml file and named it configurationx64.xml.

I have changed the <Display Level> from None to All to see the installation progress and select the Channel option to “Current.”

Read about the update channel using the below link

https://docs.microsoft.com/en-us/deployoffice/overview-update-channels

After updating the Configuratonx64.xml, I created a batch file called Install.bat and enter the below details


You can run the install.bat to install office 365 directly on the image. If you are installing directly on the image, make sure you don’t open any office application until you capture the image.

The other option is to download the office365 file and install it as an application.  

To download the office file, I have created a batch file called download.bat and enter the below details

Run command prompt as administrator and run the batch file. 

You will be able to see a new folder called office getting created under the office folder.

You can copy the file to the MDT server and create an application or copy the entire office folder to any machine and install it using the install.bat command. Since you have already downloaded files, the installation will be quick. 


Friday, January 29, 2021

Remove Windows 10 Built-In Apps when creating MDT Image

Before you run the script it is good to understand what is AppxPackage and AppxProvisioned Package

AppX packages – Applications installed with the operating system

AppX provisioned packages – Applications installed for each new user to a windows image.

The two commands which are used in the scripts are 

1) Remove-AppxProvisionedPackage 

2) Remove-AppxPackage

The Remove-AppxProvisionedPackage cmdlet removes app packages (.appx) from a Windows image. App packages will not be installed when new user accounts are created. Packages will not be removed from existing user accounts. To remove app packages (.appx) that are not provisioned or to remove a package for a particular user only, use Remove-AppxPackage instead.

https://docs.microsoft.com/en-us/powershell/module/dism/remove-appxprovisionedpackage?view=win10-ps

In MDT, When we create a windows image, we make the changes in Audit Mode, which is the administrator account but when new user login for the first time after the deployment the user profile get copied from the Default Profile (Hidden by default).

Remove-Appx-ProvisionedPackage removes the packages from Default Profile so the new users will not see those packages when they log in.
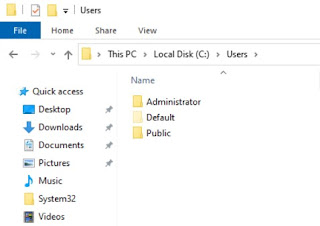

Each windows version comes with a different list of Application. It's better to run the below commands and get the list.

Get-AppxProvisionedPackage -online | select DisplayName

Get-AppxPackage | select Name


Once you get the list and decide what you want to remove, you can add it to the $AppList and the script will remove the Apps from the image.

Create a powershell script by copying the below and run it on the MDT image

$AppsList = "Microsoft.BingWeather",

"Microsoft.Getstarted",

"Microsoft.GetHelp",

"Microsoft.Messaging",

"Microsoft.Microsoft3DViewer",

"Microsoft.MicrosoftOfficeHub",

"Microsoft.MicrosoftSolitaireCollection",

"Microsoft.MixedReality.Portal",

"Microsoft.People",

"Microsoft.Office.OneNote",

"Microsoft.ScreenSketch",

"Microsoft.Wallet",

"Microsoft.windowscommunicationsapps",

"Microsoft.WindowsAlarms",

"Microsoft.SkypeApp",

"Microsoft.ZuneVideo",

"Microsoft.ZuneMusic",

"Microsoft.YourPhone",

"Microsoft.XboxSpeechToTextOverlay",

"Microsoft.XboxGamingOverlay",

"Microsoft.XboxGameOverlay",

"Microsoft.XboxIdentityProvider",

"Microsoft.XboxApp",

"Microsoft.Xbox.TCUI",

"Microsoft.WindowsMaps"

ForEach ($App in $AppsList)

{

$Packages = Get-AppxPackage | Where-Object {$_.Name -eq $App}

if ($Packages -ne $null)

{

"Removing Appx Package: $App"

foreach ($Package in $Packages) { Remove-AppxPackage -package $Package.PackageFullName }

}

else { "Unable to find package: $App" }

$ProvisionedPackage = Get-AppxProvisionedPackage -online | Where-Object {$_.displayName -eq $App}

if ($ProvisionedPackage -ne $null)

{

"Removing Appx Provisioned Package: $App"

remove-AppxProvisionedPackage -online -packagename $ProvisionedPackage.PackageName

}

else { "Unable to find provisioned package: $App" }

}


Tuesday, January 12, 2021

Mapped Share Drive not showing all the files available for the User

In this case, User has got Finance Drive (F:\) Mapped on his computer and when he opens the F: Drive he can only see one folder

If you UNC to the Finance drive \\servername\sharedFolder\ User can see more than 100 folders available to him.

The permission was right, tried deleting the Drive using 'net use' command, and logged off and logged back.

The Drive Mapped fine but still showing only one folder.

When I right-click and select properties of F: Drive it was showing the File System as CSC-CACHE

I have Created a DWORD(32Bit) FormatDatabase under HKEY_LOCAL_MACHINE\SYSTEM\CurrentControlSet\Services\Csc\Parametersset its value to 1

Restart the computer, and it will clear the MAP Drive Cache, and you will be able to see all the folder in the Mapped Drive

Thursday, December 24, 2020

"Driver PNP watchdog" after windows update on an MDT image (Windows10 20H2)

Error "Driver PNP watchdog" after windows update on an MDT image (Windows10 20H2)


I am using VMware to build and capture the image. The solution is to remove all the snapshot before updating windows. Once the upgrade finishes and restarts, you can create snapshots, and it will not cause BSOD when you restart the machine.

Friday, July 10, 2020

Create AD Account in Bulk Using PowerShell

There are quite a few articles on the internet how to use PowerShell to create a Bulk AD Accounts but what I found is they are not covering how to add or change certain attributes. I have created this script with the help of some awesome guys on the internet.

Courtesy: https://activedirectorypro.com/create-bulk-users-active-directory/#comments

# Import active directory module for running AD cmdlets
Import-Module ActiveDirectory
  
#Store the data from ADUsers.csv in the $ADUsers variable

$ADUsers = Import-csv C:\Users\senju\Desktop\ADUser\bulk_users1.csv

#Loop through each row containing user details in the CSV file 
foreach ($User in $ADUsers)
{
#Read user data from each field in each row and assign the data to a variable as below

$Username = $User.username
$Password = $User.password
$Firstname = $User.firstname
$Lastname = $User.lastname
$OU = $User.ou # Right click on the existing account, goto attribute editor and doubleclick distinguishedName and copy everything after CN
       $email      = $User.email
      $Password   = $User.Password
      $Description = $User.Description
      $MailNickName =$User.MailNickName
      $HideAddress =$User.HideAddress
      $Proxyaddresses =$User.Proxyaddresses
        
#Check to see if the user already exists in AD
if (Get-ADUser -F {SamAccountName -eq $Username})
{
#If user does exist, give a warning
Write-Warning "A user account with username $Username already exist in Active Directory."
}
else
{
#User does not exist then proceed to create the new user account

#Account will be created in the OU provided by the $OU variable read from the CSV file
     New-ADUser `
            -SamAccountName $Username `
            -UserPrincipalName "$Username@labo.local" `
            -Name "$Firstname $Lastname" `
            -GivenName $Firstname `
            -Surname $Lastname `
            -Enabled $True `
            -DisplayName "$Firstname $Lastname" `
            -Path $OU `
            -EmailAddress $email `
            -Description $Description `
            -AccountPassword (convertto-securestring $Password -AsPlainText -Force) -ChangePasswordAtLogon $False -PasswordNeverExpires $True
            
Set-ADUser -Id $UserName -Add @{
                MailNickName =$MailNickName
                }

Set-ADUser -Id $UserName -Add @{
                msExchHideFromAddressLists =$HideAddress
                }

      Set-ADUser -Identity $UserName -add @{
        Proxyaddresses=$Proxyaddresses
             }

Set-ADUser -Identity $Username -Enabled $True

         }
}

Remember to change the below items

1) Location of the CSV File
   $ADUsers = Import-csv C:\Users\senju\Desktop\ADUser\bulk_users1.csv


2) UPN 
   UserPrincipalName "$Username@labo.local (Should be your Domain)

3) Format of the excel sheet as shown below


Sunday, June 21, 2020

MDT Sysprep and Capture Fails - WinMain:The sysprep dialog box returned FALSE


In my case, the Sysprep shows running during the task sequence, but the machine restarts immediately. Upon restart, the TS fails with the below error


I have checked the setupact.log, but everything looks alright except the below line.

WinMain:The sysprep dialog box returned FALSE

So I have checked the setuperr.log and only found the below lines

Error      [0x0f0043] SYSPRP WinMain:The sysprep dialog box returned FALSE
Error         [0x0f0043] SYSPRP WinMain:The sysprep dialog box returned FALSE
Error      [0x0f0043] SYSPRP WinMain:The sysprep dialog box returned FALSE

Most of the time, Sysprep fails due to one or more windows app.so I always run the below command before the capture.

Get-AppxPackage -allusers | where-object {$_.name –notlike "*calc*"} | where-object {$_.name –notlike "*photo*"} | Remove-AppxPackage

The capture was still failing. I have double-checked by running the below command and made sure that the windows apps are removed. (Note: I haven’t removed any .net framework apps)

Run Get-AppxPackage -AllUser | Where PublisherId -eq 8wekyb3d8bbwe | Format-List -Property PackageFullName,PackageUserInformation

Below is what I did to fix my issue with Sysprep.

        Made sure Windows is up to date by running windows update.

      Updated Java to the latest version

     Checked the registry Sysprep registry keys (In My case CleanupState DWord was missing)

HKEY_LOCAL_MACHINE\SYSTEM\Setup\Status\SysprepStatus\CleanupState\ 
Set to value: 2

HKEY_LOCAL_MACHINE\SYSTEM\Setup\Status\SysprepStatus\GeneralizationState\Set to value: 7
HKEY_LOCAL_MACHINE\SOFTWARE\Microsoft\WindowsNT\CurrentVersion
\SoftwareProtectionPlatform\SkipRearm 
Set to value: 1 


     Delete the Sysprep Panther folder (C:\windows\system32\sysprep\panther)


        Restarted the machine and after the restart, the Sysprep ran successfully in Task Sequence.


Wednesday, April 1, 2020

Unable to set up budgets on Azure Subscription.

Unable to create budgets on Azure Subscription. Getting Message “Support Coming Soon”


I have tried to change the scope, logged off from the portal and login back and also tried to change the scope resulted in below error.

I have also waited 3-4 hours and checked the Service Health.
I was able to create a budget by typing cost management + Billing in the search box 

Once I clicked on create a budget, I was able to create budget.
The above step also enabled the budget option if you access it through subscription menu


Saturday, March 28, 2020

Unable to see the .csv preview in outlook


The solution is modifying the registry. Please take back up of the registry before proceeding further.
Click Start -> Run and type Regedit.
Expand HKEY_CLASSES_ROOT
You will see ShellEx and a Key underneath with a string value

You have to create the ShellEx and {8895b1c6-b41f-4c1c-a562-0d564250836f} key under .CSV in HKEY_ClASSES_ROOT
On my machine I can only see the below under .csv

 Right click on .CSV and select New and select Key
And enter ShellEx for the key Value
Now Right Click on ShellEx and Create a new key and name
{8895b1c6-b41f-4c1c-a562-0d564250836f}
You can always copy the key from .xls
Now highlight {8895b1c6-b41f-4c1c-a562-0d564250836f} and Double Click Default 
Enter the value {00020827-0000-0000-C000-000000000046}
Click Ok and exit out of registry.
Logoff and log in back and you should be able to see .csv preview in outlook


Outlook search box moved to the top of the screen


To move the outlook search button, click on the ‘Coming Soon’ label on the top right-hand corner and change it to off. Restart outlook and you will see the search box moved back to the correct location.
If coming soon is already off and the search bar is on top then turn on the ‘coming soon’ and restart outlook and then turn it off again.

Thursday, December 12, 2019

HP BIOS Update during OS Deployment - MDT

This blog is about how I added BIOS Update in Task Sequence.
Courtesy - https://deploymentbunny.com/2016/07/20/osd-bios-upgrade-during-os-deployment-in-mdtconfigmgr-v3/

The main reason to modify the script is that the amount of different model we have in our production. Even though the majority of them are HP, but it was kept on growing.

The things you need to get it working are listed below.

ModelAliasExit.vbs
InstallBios.ps1
HPBIOS Updates

First Copy the ModelAliasExit.vbs to the script folder in the deployment share. This script is used to detect the Model of the machine.  Please download it from the below location.

https://github.com/DeploymentResearch/DRFiles/blob/master/Scripts/ModelAliasExit.vbs

Once the script is copied, Edit the custom.ini file and add the below lines at the top.

[Settings]
Priority=Default
Properties=NeedReboot,MakeAlias,ModelAlias

After editing the custom.ini file, Copy the below script to notepad and save it as InstallBios.ps1.

#Set BIOS Update File

Function Import-SMSTSENV{
    try
    {
        $tsenv = New-Object -COMObject Microsoft.SMS.TSEnvironment
        Write-Output "$ScriptName - tsenv is $tsenv "
        $MDTIntegration = "YES"
       
        #$tsenv.GetVariables() | % { Write-Output "$ScriptName - $_ = $($tsenv.Value($_))" }
    }
    catch
    {
        Write-Output "$ScriptName - Unable to load Microsoft.SMS.TSEnvironment"
        Write-Output "$ScriptName - Running in standalonemode"
        $MDTIntegration = "NO"
    }
    Finally
    {
    if ($MDTIntegration -eq "YES"){
        $Logpath = $tsenv.Value("LogPath")
        $LogFile = $Logpath + "\" + "$ScriptName.log"

    }
    Else{
        $Logpath = $env:TEMP
        $LogFile = $Logpath + "\" + "$ScriptName.log"
    }
    }
}
Function Start-Logging{
    start-transcript -path $LogFile -Force
}
Function Stop-Logging{
    Stop-Transcript
}
Function Invoke-Exe{
    [CmdletBinding(SupportsShouldProcess=$true)]

    param(
        [parameter(mandatory=$true,position=0)]
        [ValidateNotNullOrEmpty()]
        [string]
        $Executable,

        [parameter(mandatory=$false,position=1)]
        [string]
        $Arguments
    )

    if($Arguments -eq "")
    {
        Write-Verbose "Running $ReturnFromEXE = Start-Process -FilePath $Executable -ArgumentList $Arguments -NoNewWindow -Wait -Passthru"
        $ReturnFromEXE = Start-Process -FilePath $Executable -NoNewWindow -Wait -Passthru
    }else{
        Write-Verbose "Running $ReturnFromEXE = Start-Process -FilePath $Executable -ArgumentList $Arguments -NoNewWindow -Wait -Passthru"
        $ReturnFromEXE = Start-Process -FilePath $Executable -ArgumentList $Arguments -NoNewWindow -Wait -Passthru
    }
    Write-Verbose "Returncode is $($ReturnFromEXE.ExitCode)"
    Return $ReturnFromEXE.ExitCode
}

# Set vars
$SCRIPTDIR = split-path -parent $MyInvocation.MyCommand.Path
$SCRIPTNAME = split-path -leaf $MyInvocation.MyCommand.Path
$SOURCEROOT = "$SCRIPTDIR\Source"
$SettingsFile = $SCRIPTDIR + "\" + $SettingsName
$LANG = (Get-Culture).Name
$OSV = $Null
$ARCHITECTURE = $env:PROCESSOR_ARCHITECTURE


#Try to Import SMSTSEnv
. Import-SMSTSENV

# Set more vars
$Make = $tsenv.Value("Make")
$Model = $tsenv.Value("Model")
$ModelAlias = $tsenv.Value("ModelAlias")
$MakeAlias = $tsenv.Value("MakeAlias")

#Get Bios Info from source folder

$CurrentBiosVersion = Get-Content "$SCRIPTDIR\Source\$Model\BIOSVer.txt"
$BIOSName = Get-Content "$SCRIPTDIR\Source\$Model\BIOSName.txt"

#Start Transcript Logging

. Start-Logging

#Output base info
Write-Output ""
Write-Output "$ScriptName - ScriptDir: $ScriptDir"
Write-Output "$ScriptName - SourceRoot: $SOURCEROOT"
Write-Output "$ScriptName - ScriptName: $ScriptName"
Write-Output "$ScriptName - Current Culture: $LANG"
Write-Output "$ScriptName - Integration with MDT(LTI/ZTI): $MDTIntegration"
Write-Output "$ScriptName - Log: $LogFile"
Write-Output "$ScriptName - Model (win32_computersystem): $((Get-WmiObject Win32_ComputerSystem).model)"
Write-Output "$ScriptName - Name (Win32_ComputerSystemProduct): $((Get-WmiObject Win32_ComputerSystemProduct).Name)"
Write-Output "$ScriptName - Version (Win32_ComputerSystemProduct): $((Get-WmiObject Win32_ComputerSystemProduct).Version)"
Write-Output "$ScriptName - Model (from TSENV): $Model"
Write-Output "$ScriptName - ModelAlias (from TSENV): $ModelAlias"

#Check Model
if($((Get-WmiObject Win32_ComputerSystem).model) -eq $Model){
    Write-Output "Model is $((Get-WmiObject Win32_ComputerSystem).model)"
    Write-Output "Checking BIOS Version"
    Write-Output "Version is $((Get-WmiObject Win32_Bios).SMBIOSBIOSVersion)"
    if($((Get-WmiObject Win32_Bios).SMBIOSBIOSVersion) -ne $CurrentBiosVersion){
        Write-Output "Needs upgrade"
        $Exe = 'HPBIOSUPDREC64.exe'
        $Location = "$SCRIPTDIR\Source\$Model"
        $Executable = $Location + "\" + $exe
        Set-Location -Path $Location
        Invoke-Exe -Executable "$Executable" -Arguments "-s -r -f $BIOSName -b" -Verbose
    }
    else
    {
        Write-Output "No Need to upgrade"
    }
}

#Stop Logging
. Stop-Logging

Next, create an application using InstallBios.ps1.


Make sure the folder structure is correct as per the below picture.
Please download and copy the bios file to the source folder and make sure it the folder name is the same as the machine model name.


Once you copied the necessary BIOS file, you have to create two text files called BIOSName.txt and BIOSVer.txt.

BIOSName.txt file has the name of the BIOS File, and BIOSVer.txt has the BIOS Version


Next step is to add the application to the task sequence. Make sure you add the task it in the system restore section of the task sequence. I have created a group called 'BIOS Update' and add the application. A computer restart is necessary after the BIOS installation, you can add it in the script or create a computer restart task.


Update the deployment share and you are ready to run the task sequence.


Saturday, October 26, 2019

Unable to install Optional Windows Features on Windows 10

Right-click on the start button and select run and type "gpedit.msc" to edit your local computer policy. Expand Computer Configuration\AdministrativeTemplates\System

In the system folder, you can see the option "Specify settings for optional component installation and component repair".


Enable the policy and select the checkbox "Download repair content and optional features directly from Windows Update instead of Windows Server Update Services (WSUS)"


You should be able to install the windows features now


Thursday, August 1, 2019

The trust relationship between this workstation and the Primary domain failed on Windows 10

The easy way to fix is to reset the computer account in Active Directory. Most of the time the machine will let you log in after resetting the account in Active Directory
If you can't resolve it by resetting the computer account, then log in to the machine as the local administrator. Remove it from the domain (Join to Workgroup) and rejoin to the domain.

Thursday, June 6, 2019

Adobe Creative Cloud Desktop App stuck on waiting for update(Mac and Windows)

I have seen many forums suggesting uninstall and reinstall all Adobe products or rename the OOBE folder but what worked for me every time is to update the ServiceConfig.xml file.
  • On Mac Machines, Sign out of Adobe CC desktop App
  • Open Activity monitor Stop all Adobe services
  • Open /Library/Application Support/Adobe/OOBE/Configs 
  • Copy the ServiceConfig.xml file to the desktop opens it with text editor then change all the 'false' value to 'true.'  Save the file. 
  • Copy and replace the existing file in  /Library/Application Support/Adobe/OOBE/Configs
  • On Windows machines, the ServiceConfig.xml file is under C:\Program Files (x86)\Common Files\Adobe\OOBE\Configs
  • Copy the file to the desktop, open it with notepad and then change the 'False' value to 'True'.
  • Save the file then copy and replace the existing fil under C:\Program Files (x86)\Common Files\Adobe\OOBE\ Configs\ServiceConfig.xml

How to Install RSAT on Windows 11 - 23H2

 Run Powershell as Admin Change the following registry key that manages the Windows Update source. HKEY_LOCAL_MACHINE\SOFTWARE\Policies\Micr...