Showing posts with label MDT. Show all posts

Wednesday, August 18, 2021

Use office deployment tool to install Office365 on MDT Image

 Download the Office deployment tool from Microsoft

https://www.microsoft.com/en-au/download/details.aspx?id=49117

Extract the file to your local machine.


The extracted folder will look like below

Depending on the version, edit the .xml file or create a copy of the .xml file. I have made a copy of the .xml file and named it configurationx64.xml.

I have changed the <Display Level> from None to All to see the installation progress and select the Channel option to “Current.”

Read about the update channel using the below link

https://docs.microsoft.com/en-us/deployoffice/overview-update-channels

After updating the Configuratonx64.xml, I created a batch file called Install.bat and enter the below details


You can run the install.bat to install office 365 directly on the image. If you are installing directly on the image, make sure you don’t open any office application until you capture the image.

The other option is to download the office365 file and install it as an application.  

To download the office file, I have created a batch file called download.bat and enter the below details

Run command prompt as administrator and run the batch file. 

You will be able to see a new folder called office getting created under the office folder.

You can copy the file to the MDT server and create an application or copy the entire office folder to any machine and install it using the install.bat command. Since you have already downloaded files, the installation will be quick. 


Friday, January 29, 2021

Remove Windows 10 Built-In Apps when creating MDT Image

Before you run the script it is good to understand what is AppxPackage and AppxProvisioned Package

AppX packages – Applications installed with the operating system

AppX provisioned packages – Applications installed for each new user to a windows image.

The two commands which are used in the scripts are 

1) Remove-AppxProvisionedPackage 

2) Remove-AppxPackage

The Remove-AppxProvisionedPackage cmdlet removes app packages (.appx) from a Windows image. App packages will not be installed when new user accounts are created. Packages will not be removed from existing user accounts. To remove app packages (.appx) that are not provisioned or to remove a package for a particular user only, use Remove-AppxPackage instead.

https://docs.microsoft.com/en-us/powershell/module/dism/remove-appxprovisionedpackage?view=win10-ps

In MDT, When we create a windows image, we make the changes in Audit Mode, which is the administrator account but when new user login for the first time after the deployment the user profile get copied from the Default Profile (Hidden by default).

Remove-Appx-ProvisionedPackage removes the packages from Default Profile so the new users will not see those packages when they log in.
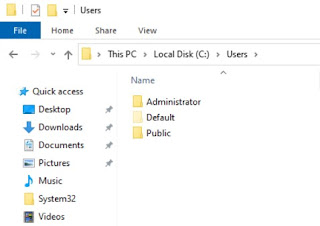

Each windows version comes with a different list of Application. It's better to run the below commands and get the list.

Get-AppxProvisionedPackage -online | select DisplayName

Get-AppxPackage | select Name


Once you get the list and decide what you want to remove, you can add it to the $AppList and the script will remove the Apps from the image.

Create a powershell script by copying the below and run it on the MDT image

$AppsList = "Microsoft.BingWeather",

"Microsoft.Getstarted",

"Microsoft.GetHelp",

"Microsoft.Messaging",

"Microsoft.Microsoft3DViewer",

"Microsoft.MicrosoftOfficeHub",

"Microsoft.MicrosoftSolitaireCollection",

"Microsoft.MixedReality.Portal",

"Microsoft.People",

"Microsoft.Office.OneNote",

"Microsoft.ScreenSketch",

"Microsoft.Wallet",

"Microsoft.windowscommunicationsapps",

"Microsoft.WindowsAlarms",

"Microsoft.SkypeApp",

"Microsoft.ZuneVideo",

"Microsoft.ZuneMusic",

"Microsoft.YourPhone",

"Microsoft.XboxSpeechToTextOverlay",

"Microsoft.XboxGamingOverlay",

"Microsoft.XboxGameOverlay",

"Microsoft.XboxIdentityProvider",

"Microsoft.XboxApp",

"Microsoft.Xbox.TCUI",

"Microsoft.WindowsMaps"

ForEach ($App in $AppsList)

{

$Packages = Get-AppxPackage | Where-Object {$_.Name -eq $App}

if ($Packages -ne $null)

{

"Removing Appx Package: $App"

foreach ($Package in $Packages) { Remove-AppxPackage -package $Package.PackageFullName }

}

else { "Unable to find package: $App" }

$ProvisionedPackage = Get-AppxProvisionedPackage -online | Where-Object {$_.displayName -eq $App}

if ($ProvisionedPackage -ne $null)

{

"Removing Appx Provisioned Package: $App"

remove-AppxProvisionedPackage -online -packagename $ProvisionedPackage.PackageName

}

else { "Unable to find provisioned package: $App" }

}


Thursday, December 12, 2019

HP BIOS Update during OS Deployment - MDT

This blog is about how I added BIOS Update in Task Sequence.
Courtesy - https://deploymentbunny.com/2016/07/20/osd-bios-upgrade-during-os-deployment-in-mdtconfigmgr-v3/

The main reason to modify the script is that the amount of different model we have in our production. Even though the majority of them are HP, but it was kept on growing.

The things you need to get it working are listed below.

ModelAliasExit.vbs
InstallBios.ps1
HPBIOS Updates

First Copy the ModelAliasExit.vbs to the script folder in the deployment share. This script is used to detect the Model of the machine.  Please download it from the below location.

https://github.com/DeploymentResearch/DRFiles/blob/master/Scripts/ModelAliasExit.vbs

Once the script is copied, Edit the custom.ini file and add the below lines at the top.

[Settings]
Priority=Default
Properties=NeedReboot,MakeAlias,ModelAlias

After editing the custom.ini file, Copy the below script to notepad and save it as InstallBios.ps1.

#Set BIOS Update File

Function Import-SMSTSENV{
    try
    {
        $tsenv = New-Object -COMObject Microsoft.SMS.TSEnvironment
        Write-Output "$ScriptName - tsenv is $tsenv "
        $MDTIntegration = "YES"
       
        #$tsenv.GetVariables() | % { Write-Output "$ScriptName - $_ = $($tsenv.Value($_))" }
    }
    catch
    {
        Write-Output "$ScriptName - Unable to load Microsoft.SMS.TSEnvironment"
        Write-Output "$ScriptName - Running in standalonemode"
        $MDTIntegration = "NO"
    }
    Finally
    {
    if ($MDTIntegration -eq "YES"){
        $Logpath = $tsenv.Value("LogPath")
        $LogFile = $Logpath + "\" + "$ScriptName.log"

    }
    Else{
        $Logpath = $env:TEMP
        $LogFile = $Logpath + "\" + "$ScriptName.log"
    }
    }
}
Function Start-Logging{
    start-transcript -path $LogFile -Force
}
Function Stop-Logging{
    Stop-Transcript
}
Function Invoke-Exe{
    [CmdletBinding(SupportsShouldProcess=$true)]

    param(
        [parameter(mandatory=$true,position=0)]
        [ValidateNotNullOrEmpty()]
        [string]
        $Executable,

        [parameter(mandatory=$false,position=1)]
        [string]
        $Arguments
    )

    if($Arguments -eq "")
    {
        Write-Verbose "Running $ReturnFromEXE = Start-Process -FilePath $Executable -ArgumentList $Arguments -NoNewWindow -Wait -Passthru"
        $ReturnFromEXE = Start-Process -FilePath $Executable -NoNewWindow -Wait -Passthru
    }else{
        Write-Verbose "Running $ReturnFromEXE = Start-Process -FilePath $Executable -ArgumentList $Arguments -NoNewWindow -Wait -Passthru"
        $ReturnFromEXE = Start-Process -FilePath $Executable -ArgumentList $Arguments -NoNewWindow -Wait -Passthru
    }
    Write-Verbose "Returncode is $($ReturnFromEXE.ExitCode)"
    Return $ReturnFromEXE.ExitCode
}

# Set vars
$SCRIPTDIR = split-path -parent $MyInvocation.MyCommand.Path
$SCRIPTNAME = split-path -leaf $MyInvocation.MyCommand.Path
$SOURCEROOT = "$SCRIPTDIR\Source"
$SettingsFile = $SCRIPTDIR + "\" + $SettingsName
$LANG = (Get-Culture).Name
$OSV = $Null
$ARCHITECTURE = $env:PROCESSOR_ARCHITECTURE


#Try to Import SMSTSEnv
. Import-SMSTSENV

# Set more vars
$Make = $tsenv.Value("Make")
$Model = $tsenv.Value("Model")
$ModelAlias = $tsenv.Value("ModelAlias")
$MakeAlias = $tsenv.Value("MakeAlias")

#Get Bios Info from source folder

$CurrentBiosVersion = Get-Content "$SCRIPTDIR\Source\$Model\BIOSVer.txt"
$BIOSName = Get-Content "$SCRIPTDIR\Source\$Model\BIOSName.txt"

#Start Transcript Logging

. Start-Logging

#Output base info
Write-Output ""
Write-Output "$ScriptName - ScriptDir: $ScriptDir"
Write-Output "$ScriptName - SourceRoot: $SOURCEROOT"
Write-Output "$ScriptName - ScriptName: $ScriptName"
Write-Output "$ScriptName - Current Culture: $LANG"
Write-Output "$ScriptName - Integration with MDT(LTI/ZTI): $MDTIntegration"
Write-Output "$ScriptName - Log: $LogFile"
Write-Output "$ScriptName - Model (win32_computersystem): $((Get-WmiObject Win32_ComputerSystem).model)"
Write-Output "$ScriptName - Name (Win32_ComputerSystemProduct): $((Get-WmiObject Win32_ComputerSystemProduct).Name)"
Write-Output "$ScriptName - Version (Win32_ComputerSystemProduct): $((Get-WmiObject Win32_ComputerSystemProduct).Version)"
Write-Output "$ScriptName - Model (from TSENV): $Model"
Write-Output "$ScriptName - ModelAlias (from TSENV): $ModelAlias"

#Check Model
if($((Get-WmiObject Win32_ComputerSystem).model) -eq $Model){
    Write-Output "Model is $((Get-WmiObject Win32_ComputerSystem).model)"
    Write-Output "Checking BIOS Version"
    Write-Output "Version is $((Get-WmiObject Win32_Bios).SMBIOSBIOSVersion)"
    if($((Get-WmiObject Win32_Bios).SMBIOSBIOSVersion) -ne $CurrentBiosVersion){
        Write-Output "Needs upgrade"
        $Exe = 'HPBIOSUPDREC64.exe'
        $Location = "$SCRIPTDIR\Source\$Model"
        $Executable = $Location + "\" + $exe
        Set-Location -Path $Location
        Invoke-Exe -Executable "$Executable" -Arguments "-s -r -f $BIOSName -b" -Verbose
    }
    else
    {
        Write-Output "No Need to upgrade"
    }
}

#Stop Logging
. Stop-Logging

Next, create an application using InstallBios.ps1.


Make sure the folder structure is correct as per the below picture.
Please download and copy the bios file to the source folder and make sure it the folder name is the same as the machine model name.


Once you copied the necessary BIOS file, you have to create two text files called BIOSName.txt and BIOSVer.txt.

BIOSName.txt file has the name of the BIOS File, and BIOSVer.txt has the BIOS Version


Next step is to add the application to the task sequence. Make sure you add the task it in the system restore section of the task sequence. I have created a group called 'BIOS Update' and add the application. A computer restart is necessary after the BIOS installation, you can add it in the script or create a computer restart task.


Update the deployment share and you are ready to run the task sequence.


Wednesday, January 16, 2019

How to change WIM Image name and Description


Download WinToolkit.exe from the below website or internet
Run the WinToolkit.exe
  Go to Intermediate option and select WIM Manage
 

Click on Browse and select the WIM image
Once the WIM is loaded, click on the edit button at the bottom
Click on Edit Name or Desc


I have changed the image name to Windows 10 Enterprise


Close the program. NB: You don’t have to Rebuild the image after changing name and description

How to Install RSAT on Windows 11 - 23H2

 Run Powershell as Admin Change the following registry key that manages the Windows Update source. HKEY_LOCAL_MACHINE\SOFTWARE\Policies\Micr...